Wednesday, September 13, 2006

Tangy chicken "stew" with couscous

Most stews are heavy and hearty, and that's why this is "stew" in quotation marks. It's considerably lighter, with a thinner sauce than most stews have. I didn't want to make a full-on stew, but since the weather is getting cooler, I wanted something with a little more substance than my usual summer meals. The vinegar and lemon juice give the broth a nice tart and tangy flavor. Couscous tends to soak up liquids like a sponge, which is why it's the starch of choice here; the sauce gets absorbed into the couscous, giving the tiny pasta lots of flavor. However, I have met people who don't like couscous (namely my mother), so rice would work as well.


Tangy chicken "stew" with couscous
serves 4

For the couscous:
1 1/2 cups chicken broth
1 cup uncooked couscous

Bring the chicken broth to a boil. Add the couscous, cover, and remove from heat. Set aside while making the rest of the dish.


For the stew:
2 tablespoons extra virgin olive oil
6 boneless skinless chicken thighs, cut into large bite-size pieces
2 teaspoons kosher salt
Freshly ground black pepper to taste
1 teaspoon ground cumin
1 teaspoon paprika
1/4 teaspoon cayenne pepper (optional)
2 carrots, peeled and sliced into 1/4" rounds
1 red onion, roughly chopped
2 cups chicken broth
2 tablespoons apple cider vinegar or red wine vinegar
Zest of 1 lemon
Juice of 1/2 lemon

Heat the oil in a Dutch oven or deep skillet. Add the chicken, and sprinkle with salt, pepper, cumin, and paprika. Allow chicken to brown on all sides, about 5 minutes total. Add the carrots and onion and cook, stirring, for 2 minutes. Add chicken broth, vinegar, lemon zest, and lemon juice and bring to a boil. Lower the heat to a simmer, cover, and cook for 8 minutes.

Fluff up the couscous with a fork. Serve the chicken mixture in bowls over the couscous.

Technorati tags: , , ,

Tuesday, September 05, 2006

Sourdough

To make sourdough bread, you need two things: a healthy and active starter, and some patience.

Wild yeast takes longer to get its job done than commercial yeast. I can turn out a loaf of country white bread in about 6 hours, and that includes making a sponge and letting the dough rise twice. A bare-bones bread recipe with no sponge and only one rise takes me 3-4 hours. Sourdough? Anywhere from 30-48 hours. Starting on a loaf of sourdough means knowing that you'll be getting the end result some time the next day.

The first phase involves expanding your starter. This wakes up your yeast and multiplies it to quantities that will be able to leaven a loaf of bread. Start with two tablespoons of stiff starter, and feed it with about 1/3 cup of bread flour and 2 tablespoons of water. Let it double, then toss half of it, and feed the rest with 2/3 cup of bread flour and 3 1/2 tablespoons of water. Let it double again.

Sourdough starter

This is my starter expanding. The bubbles all around the sides are a good sign. This stage can take up to 16 hours, unless you have whatever weirdo mutant strain of yeast that I have in my apartment, which gets the job done in less than 4 hours.

So, now there's an expanded starter, and now you can actually start making your dough. Take 2/3 cup of the expanded starter, add 1 1/4 cups of bread flour, 2/3 cup of warm water, and a teaspoon of salt. Knead for 5 minutes, let rest for 20 minutes, then knead again for 5-10 minutes.

Let the dough rise for an hour, and punch it down. Repeat. Then let the dough rise until doubled.

Rising sourdough

Ok, now the dough is risen. However, it's very moist and very soft, and if you threw it in the oven right now, you'd end up with a big flat pancake...

Drying out the skin

...so the next step involves putting the dough into a towel-lined colander and letting it rise until it's doubled. This pulls moisture out of the dough, creating a skin that will hold the dough together when you bake it. (It also makes a spiffy design on the crust.)

After 25 minutes of baking...

Sourdough loaf

Finished sourdough

Crusty outside, chewy inside, with a nice tangy flavor. Not bad for a day and a half, especially considering that you don't have to do anything with the dough for most of that time. I should definitely do this more often than once every 5 months.

Technorati tags: , , ,

Friday, September 01, 2006

Grissini

Homemade grissini


There's a bit of a chill in the air today. After an incredibly hot summer, this is good news... but it's even better news for those of us who enjoy baking. Now, I like cooking and putting together meals, certainly. However, my true kitchen love is baking, especially bread baking. Cakes and cookies are all well and good, but there's something about getting my hands into a ball of dough that I find incredibly satisfying. No, no stand mixer here, just me and my skinny arms. :)

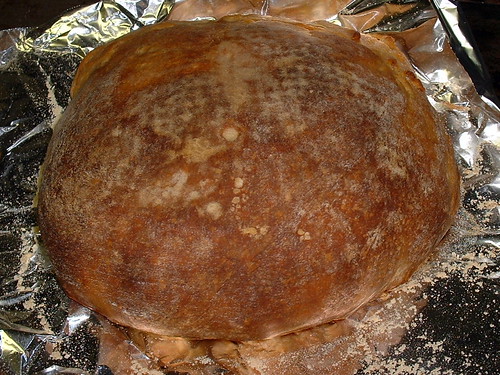
First off, anticipating the cooler weather that's coming, I got out my sourdough starter and fed it. It seems to have made it through the summer hibernation just fine, so there will definitely be some sourdough products making an appearance. The process for making sourdough breads isn't much different than the one for making cultivated yeast breads... it just takes much, much longer. They're worth it, though.

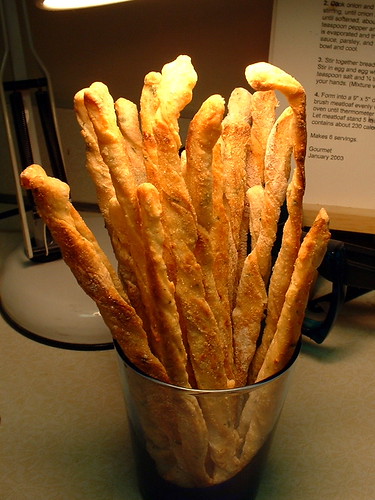
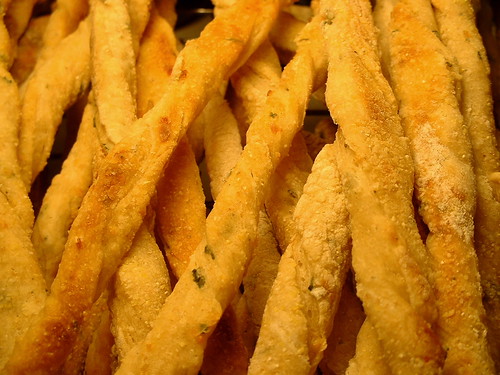
I also needed some baking instant gratification, so I made a batch of grissini (thin, crunchy breadsticks). I flavor mine with parmesan cheese, garlic powder, and cayenne pepper. They come out crispy, perfect for snacking. Personally, I like the kick from the cayenne pepper, but it can certainly be left out.

Homemade grissini - closeup


Grissini
Makes about 50 breadsticks

1/2 teaspoon instant yeast
1/2 teaspoon sugar
1/4 cup warm water (about 100 degrees)

2 cups bread flour
1/4 cup whole wheat flour
1 teaspoon salt
1 teaspoon black pepper
1/2 teaspoon garlic powder
1/2 cup grated Parmesan cheese
1 tablespoon minced herbs (basil, parsley, rosemary, thyme, and/or sage would work nicely)
1/4 teaspoon cayenne pepper (optional)
3/4 cup warm water (about 100 degrees)
Cornmeal for dusting

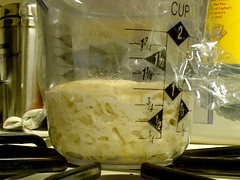
Bloom the yeast: Combine the yeast, sugar, and 1/4 cup warm water in a small bowl. Allow to sit for 5-10 minutes. If your yeast is alive and kicking, a foamy layer will develop. If this doesn't happen, try again.

Mix and knead the dough: Meanwhile, combine the bread flour, whole wheat flour, salt, pepper, garlic powder, Parmesan cheese, minced herbs, and cayenne pepper in a large mixing bowl. Whisk to evenly distribute the ingredients. Add the yeast mixture and 3/4 cup warm water to the flour mixture. Stir until the dough comes together and begins to pull away from the sides of the bowl. Turn the dough out on to a floured surface and knead lightly until it is smooth and elastic, about 5 minutes.

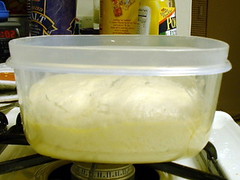
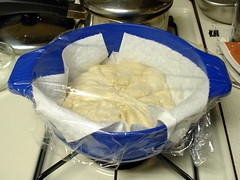
Allow the dough to rise: Lightly coat the inside of a large bowl (1-qt or larger) with olive oil. Transfer the dough to the bowl, turning to coat with oil. Push the dough down to create a flat surface, and make note of where double the current dough height is with a rubber band or piece of tape. Cover the bowl with a lid or plastic wrap, and allow to rise at room temperature for one hour. Gently deflate the dough, then re-cover and allow to rise for another hour. Deflate the dough again, and let it rise for one hour or until doubled the initial volume.

Prepare the oven and baking sheet(s): Preheat the oven to 375 degrees. Position an oven rack on the second slot up from the bottom. Line a baking sheet with parchment paper.

Shape the dough and bake: Lightly dust your work surface with cornmeal. Cut the dough into quarters. While working with one piece of dough, cover and refrigerate the other pieces. Form one dough quarter into a ball and flatten it gently. Dust the top with more cornmeal. Roll out the dough to 1/8" thick, and then cut into 1/2" wide ribbons with a knife or pizza cutter. Give each ribbon a few twists before setting on the baking sheet. Brush each breadstick with olive oil and sprinkle lightly with cornmeal. Bake for 14-18 minutes or until golden. Repeat with remaining dough. If you have multiple baking sheets, you can, of course, work with two or more dough batches at once.

Finishing: Allow the breadsticks to cool. They will still be slightly soft and chewy at this stage, and you can leave them this way if desired. If you want them completely crunchy, return them to the oven at the lowest possible temperature setting (pilot light, if you have that option) for about an hour or until totally crisp.

Technorati tags: , , ,